How do I onboard a new client in wedding planner software?
Learn how to onboard a new client in wedding planner software: set up the CRM, portal, budget, vendors, and timeline with a clear, planner-led workflow.
Featured

To onboard a new client in wedding planner software in 2026, organize their CRM record, confirm the booked scope, prepare their planning workspace, set client access, and assign the first tasks before reviewing the setup together. Keep internal notes separate from client-facing information, and confirm which dates, budgets, and vendor bookings are final rather than treating every inquiry detail as approved.
TL;DR
Rundown fits planners who want CRM, client portals, budgets, timelines, and vendor coordination in one system.
How do I onboard a new client in wedding planner software? Confirm scope, prepare the workspace, and verify access.
Give clients clear first tasks, not an empty portal or your entire internal checklist.
Complete onboarding when the client can access their information and understands the next decision.
Why this matters
Your onboarding process sets the rules for the planning relationship: where decisions live, who approves changes, and what happens next. An invitation email alone does not establish any of that. A client can successfully log in and still have no idea what you need from them.
For independent planners managing roughly 10–30 weddings per year, use the same onboarding structure while tailoring the actual assignments to each booked service. Consistency belongs in the process, not in assumptions about the couple.
Rundown is best for planners who want CRM, client portals, budgets, timelines, and vendor coordination in one system. For your 2026 workflow, evaluate that connected setup against a concrete requirement: can you carry approved client information from the inquiry stage through the final timeline without losing its context?
How do I onboard a new client in wedding planner software?
Use this seven-step sequence. These are workflow instructions, not platform-specific menu names; complete each action using the controls your software provides.
Prepare CRM: Review the inquiry record, contact details, wedding date, and decision-makers. Resolve duplicates before adding more information.
Confirm scope: Record the booked service and its boundaries. Distinguish agreed responsibilities from requests that still need discussion.
Build workspace: Organize the event details, budget, vendor information, and working timeline around that scope.
Set access: Decide what the couple, collaborators, and your team should see before sending invitations.
Collect details: Request missing planning information with clear instructions and a place to record answers.
Assign next steps: Give each immediate task an owner, a due date, and a clear completion condition.
Review readiness: Check access with the client, explain the workflow, and confirm the next planning milestone.
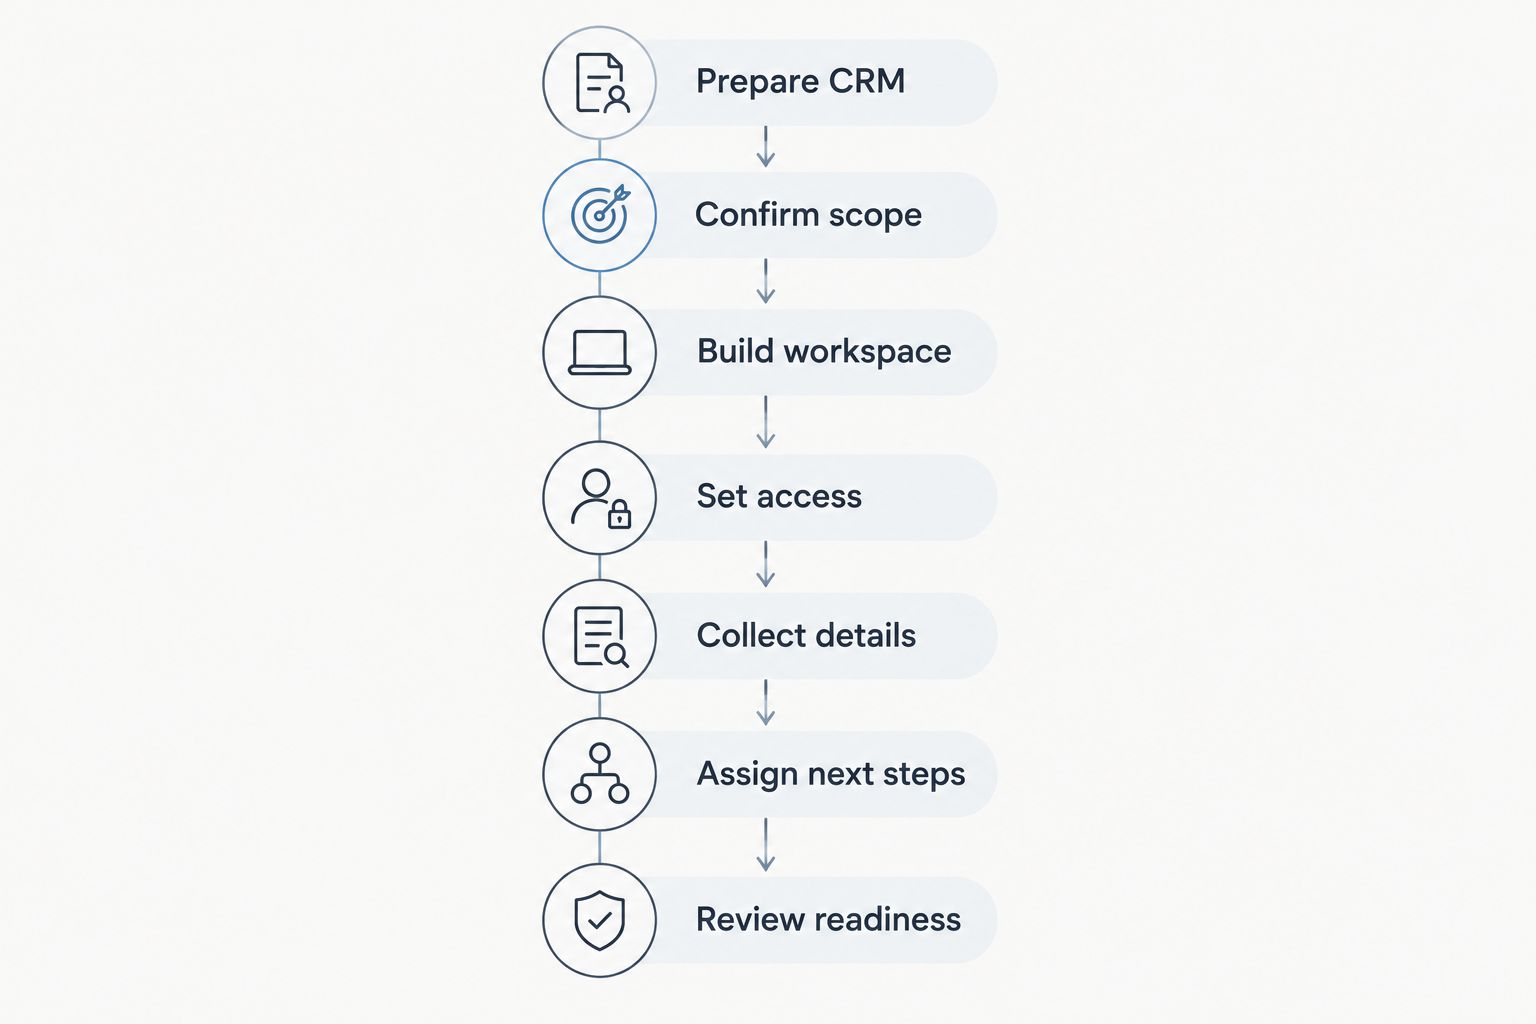
Prepare the workspace and permissions before asking the client to use it.
1. Prepare CRM: clean up the inquiry record
Start with the information you already collected. Review the couple's names, preferred contact details, event date, venue status, and the person responsible for approvals. If an inquiry came through several channels, consolidate the information into a working record rather than maintaining competing versions.
Separate confirmed facts from open questions. A venue mentioned during a discovery call is not necessarily booked; a preferred wedding date is not necessarily final. Use the status fields your software provides, or write clear notes if it does not offer suitable fields.
Record communication preferences without assuming every contact needs the same access. Ask whether both partners want planning messages and who should receive questions about financial decisions. Finish this step with a reliable contact record, not merely a populated one.
2. Confirm scope: turn the proposal into responsibilities
Use the agreed proposal and contract as your reference for onboarding. Record what you are responsible for, what the client retains, and when your involvement begins. Do not let a generic planning template expand the service the couple actually booked.
For example, confirm who researches vendors, who approves bookings, and who supplies existing contracts. These are questions to resolve with the client, not responsibilities to assign automatically because a checklist includes them.
Where your software supports documents, keep the relevant agreement accessible to the people who need it. Otherwise, record where the approved version is held. Keep acceptance and payment status distinct from planning tasks; a completed questionnaire is not evidence that the booking requirements are satisfied. Your own agreement determines those requirements.
3. Build workspace: prepare the planning structure
Create or organize the event workspace around the booked service. Include the wedding details, budget structure, vendor records, working timeline, and immediate planning tasks that you will actually use. Remove irrelevant template items before the client encounters them.
Start the budget with agreed categories and known commitments. Mark missing information clearly instead of entering guesses to make the workspace look complete. Likewise, distinguish an initial timeline outline from a confirmed runsheet.
Add existing vendor information with its source: a client-supplied contract, a confirmed booking message, or an item awaiting verification. This gives you a basis for follow-up without presenting uncertain details as final.
A useful workspace shows what is known, what needs confirmation, and who owns the next action. It does not need every planning field filled before onboarding begins.
4. Set access: decide what each person can see
Review permissions before sending the portal invitation. Identify client-facing information, internal planning notes, and material intended only for your team. If your software offers permission controls, check the actual settings rather than assuming a role name provides the right access.
Keep your internal business information separate from the couple's event budget. Vendor contact details, private client information, and working notes also deserve deliberate handling. Only include information that serves the recipient's role in the event.
Test the client-facing view if your software provides that option. Otherwise, use the first walkthrough to verify visibility with the client. See the guide to client data security in wedding planner software when reviewing what to check before sharing access.
5. Collect details: ask for information you can use
Request the information needed for the next planning phase, not every detail you might eventually require. Ask about priorities, known bookings, budget decisions, planning constraints, and outstanding questions that affect your immediate work.
Explain why each request matters. A vendor contract request supports coordination; a decision-maker question establishes who approves changes. Plain instructions help the couple understand what a useful response looks like.
Specify where answers belong. Use the portal or another agreed collection method supported by your setup, then bring approved information into the working record. Avoid leaving a key decision buried in an email while the planning workspace shows an older assumption.
When an answer changes scope, pause and resolve that change through your business process. Do not quietly turn a questionnaire response into an additional commitment.
6. Assign next steps: make the first visit useful
Give the client a short starting list. A practical default is three initial tasks: verify event details, provide existing vendor information, and identify the next decision requiring their approval. Adjust that list to the booked service rather than treating it as a universal requirement.
For each task, identify an owner, a due date, and what counts as complete. Replace vague instructions such as reviewing the budget with a specific request to confirm categories or flag an unresolved allocation.
Set deadlines against the actual planning schedule, not arbitrary urgency. If you need a document before a vendor conversation, explain that dependency. Assign your own follow-up tasks too, so the client can understand what happens after they respond. The next move should be obvious on both sides of the relationship.
7. Review readiness: walk through the client experience
Use the onboarding conversation to verify that the client can open the invitation, reach the correct workspace, find their tasks, and understand where to send questions. Ask them to complete a real action during the walkthrough rather than only watching you demonstrate it.
Explain how you will handle approvals, updates, and changes to already-confirmed information. Be clear about which communication channel you will treat as the record for decisions. Do not promise notifications or automation unless your configured software supports them.
Close by confirming the next planning milestone and each person's immediate responsibilities. Record unresolved questions with an owner. Onboarding is complete when the client understands how to participate, not when every future planning detail has been collected.
Your 2026 client onboarding checklist
Use this checklist before marking a new client ready for active planning. It tests the setup and the relationship, not just whether you sent an invitation.
Contact record
Ready when: Names, contacts, and approval roles are confirmed
Fix before proceeding: Duplicate records or unclear decision-makers
Booked scope
Ready when: Responsibilities match the agreed service
Fix before proceeding: Template tasks that imply unbooked work
Event details
Ready when: Confirmed information is separate from open questions
Fix before proceeding: Tentative dates presented as final
Budget
Ready when: Known commitments and unresolved items are clear
Fix before proceeding: Guessed figures or unclear approval status
Vendor records
Ready when: Existing bookings have usable contact information
Fix before proceeding: Unverified contacts or missing documents
Client access
Ready when: The client can reach the intended information
Fix before proceeding: Excess visibility or inaccessible materials
First tasks
Ready when: Each action has an owner and completion condition
Fix before proceeding: A long list with no clear starting point
Keep a reusable onboarding checklist for your business, then adapt the event workspace to the client. The advantage is consistent preparation; the trade-off is that templates still need review. Copying without checking preserves mistakes as easily as it preserves good structure.
When you revise your 2026 checklist, change the reusable process rather than relying on memory to fix the same issue for every new booking.
Why client onboarding varies
The sequence stays consistent, but the contents depend on the work you agreed to deliver. Build your 2026 onboarding around these factors:
Booked scope: Your assignments must reflect the responsibilities in the client's agreement.
Existing information: An organized set of vendor contracts needs different follow-up from an incomplete inquiry record.
Decision-makers: Confirm who contributes information and who has authority to approve changes.
Planning stage: Request details needed for the current phase before collecting later-stage information.
Access requirements: Match visibility to each person's role rather than sharing the same material with everyone.
Unresolved decisions: Keep tentative dates, budgets, and vendor choices distinct from confirmed commitments.
Do not add work simply to make every workspace look identical. Standardize the checks; customize the contents.
Should I send the client portal invite before the kickoff call?
Send the invitation after preparing the workspace and checking access. You can send it before the kickoff call when you want the client to review details or complete a specific task beforehand. Explain exactly what to do before the call and what you will cover together.
An invitation with no instructions leaves the client to interpret an unfamiliar system. Pair access with a purpose.
What should I put in the client portal first?
Put the confirmed event details, immediate tasks, and information needed for the next decision in the portal first. Include the relevant budget or vendor material when it supports that work and your access settings permit it.
Keep internal notes separate. A client-facing portal should explain their part in the process, not expose every unfinished item on your operational checklist.
How do I know client onboarding is complete?
Client onboarding is complete when access works, responsibilities are understood, and the next actions are assigned. Open planning questions can remain, provided each one has an owner and a clear follow-up.
Do not confuse onboarding completion with a finished wedding plan. The goal is a working relationship and a usable planning record.
Put the connected workflow to work
Rundown wedding planner software brings CRM, client portals, timelines, budgets, and vendor coordination into one system. That makes it relevant when you want the same planning context to carry from first inquiry to last dance.
The software does not decide your scope, approve a client's budget, or determine who should see private notes. You remain responsible for those decisions. Use the free plan to work through your onboarding checklist and assess how the setup fits your actual planning process.
Start your client onboarding setup
Use the free plan to explore CRM, client portals, timelines, budgets, and vendor coordination.
FAQ
How do I onboard a new client in wedding planner software?
Prepare the CRM record, confirm scope, build the workspace, check access, collect missing details, assign tasks, and review the setup with the client. Finish when the client understands where information lives and what happens next.
What information should I collect from a new wedding planning client?
Collect confirmed contact details, event information, decision-makers, planning priorities, known vendor bookings, and the budget information needed for your work. Request only information relevant to the booked service and current planning phase.
Should both partners have access to the client portal?
Ask both partners how they want to participate before assigning access. Confirm who receives updates and who approves decisions, then use the permissions your software supports.
Can I use the same onboarding template for every wedding?
Use the same process checklist, but tailor tasks and information requests to each booked service. Review copied dates, responsibilities, and vendor details before sharing the workspace.
Do I need to finish the wedding timeline before onboarding?
No, a final wedding timeline is not required to complete onboarding. Start with confirmed details and a working outline, keeping tentative information clearly marked.
What does Rundown include for wedding planner onboarding?
Rundown wedding planner software includes CRM, client portals, timelines, budgets, and vendor coordination. Use those functions to organize the client relationship while retaining responsibility for scope, permissions, and approvals.
Should I automate every new client onboarding step?
No, keep review points for scope, client access, and uncertain information. Use automation only where your software supports it and after checking what triggers the action and what the client receives.
One last thing
Test your 2026 onboarding from the client's side before adding more instructions. A missing permission, an unclear task, or an outdated event detail needs a setup change—not a longer welcome email.
Ask the client to locate their next action and explain what they need to provide. If the answer differs from your intention, correct the task or workspace together. Keep that correction in your reusable checklist when it applies to future bookings. A useful onboarding process makes the first planning decision clear without asking the couple to learn your entire operating system.
Related guides